Add candle warmth to your home decor. It will beautify your space and make it fragrant. You can easily use it and enjoy the aroma without opening the flame. Below, we analyze how you can use this warm candle in detail.
Overview 🔰
Source of the Leakage
Sprayer head
Connection of hose
cartridge
The body of the hose
Tools or Materials
Wrench
Puller tool
Vinegar
Toothbrush
Towel or rag
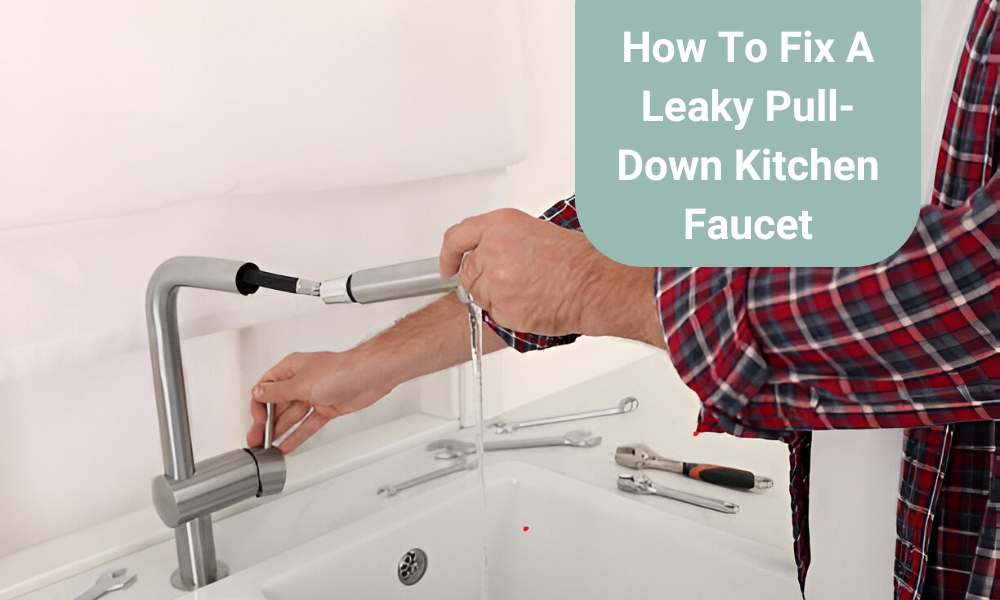
Methods of Fixing a Leaky Pull-Down Kitchen Faucet
First, you must identify the source of your kitchen faucet’s leakage. Repairing a faucet without identifying the source of the problem is just a waste of time. Once you have found the source of the leakage, you can use the following fixing methods to meet your needs.
Here, you will find some easy methods of “how to fix a leaky pull-down kitchen faucet.”
Fixing Pull-Down Kitchen Faucet Leaking Hose
Monitor your kitchen faucet and find the cause of the leakage. If you find the faucet sprayer hose leaking, you need to repair the hose. This problem usually occurs when the faucet hose is old. You don’t need to replace the entire faucet system to fix this problem. You can solve the leakage by just changing the hose.
Start by turning off the faucet’s water supply to repair the hose. Use the water supply shut-off valve under the sink to stop the water supply. Next, separate the spray hose from the high-pressure hose under the sink. Once the previous tasks are done, you can pull the hose out through the faucet hole.
Now, insert the new hose through the faucet hole. Next, you need to fit the weight on the new hose and connect the new hose to the high-pressure pipe. Finally, turn on the water supply to see if the leakage has been repaired. After turning on the water faucet, if there is no leakage anywhere, it should be understood that the leakage has been fixed.
Fixing Pull Down or Pull Out Kitchen Faucet Leaking Spray Head
Leakage only occurs if the hose is old. Sometimes, water leakage occurs because the spray head is old and damaged. Due to prolonged use, dirt and minerals accumulate in the spray head. Many times, due to this, leakage occurs at the spray head.
It is essential to clean the dirt and minerals accumulated in the spray head for repair. You can repair the spray head in two ways. The first is to clean it with a toothbrush or vinegar; the other is to replace the spray head.
You need to disconnect the spray head from the hose to clean the spray head. Then, wet a toothbrush with water and gently rub the spray head with the toothbrush to remove the dirt. Wash off the spray head with water. Soak the spray head in vinegar if necessary, then rinse with water. After cleaning, connect the spray head to the previous place.
If you want to follow the second method, you need to disassemble the old spray head:
Turn off the water supply. Unscrew the old spray head.
You remove the washer and C clip. Now, take a new spray head that fits your old spray head model and attach the washer and C clip properly to the new spray head.
Attach the new spray head in place.
Turn on the water tap to see if the leakage has been repaired.
Replacing Internal Cartridges
Sometimes, the inner cartridge gets damaged. Leakage occurs when the internal cartridge is damaged. However, it is difficult to know if the cartridge is entirely defective. So, replacing the cartridge with a new one is an excellent decision.
Start by turning off the water supply. Place a towel or rag under the sink to catch any water that drips while repairing.
Loosen the screw attached to the handle with a screwdriver. Gently lift and separate the handle. Different faucets are of other models. Usually, a decorative cap or retaining nut helps keep the cartridge in place. Separate all materials from the cartridge.
Now, you need to remove the old cartridge. You can use a wrench to do this, but you must do it carefully so that nothing gets damaged. Sometimes, the cartridge is stuck so that you can use a puller tool.
Now, it’s time to install the new cartridge. Now, you need to insert the cartridge inside the faucet body. Follow the manufacturer’s instructions when attaching the cartridge. If you feel the cartridge needs to be lubricated, apply the plumber’s grease to the ring. Replace retaining nuts, decorative caps, or other materials. Then, keep the handle back in the proper place and attach it with the screw.
To check the leakage, turn on the water supply. If there is any leakage, you need to tighten the connection. Then, turn on the faucet and ensure the cartridge is functioning correctly and leakage-free.
Sealing Screw Connection
Sometimes, leakage is also caused by faulty threaded connections between the sprinkler spray and the shower hose. In this case, you have to remove the hose. Next, you replace the seal. You can use a small amount of grease. Now, reconnect the hose.
Maintenance of the Kitchen Faucet
If we don’t take care of our kitchen faucets regularly, they will not work well, and we won’t have to bother with repairs. So, apart from knowing how to repair it, we must understand faucet maintenance. Now, we will learn how to do faucet maintenance.
Daily Care
A little daily care helps keep kitchen faucets beautiful and functional. You can wipe the faucets with a little cleanser on a wet cloth every day after cooking. Next, wipe it with a cotton cloth to dry it. You can also use window cleaner to clean if you want.
Cleaning the Aerator
It is essential to keep the aerator clean so the kitchen faucet works correctly. Cleaning the aerator of the kitchen faucet is a simple task. First, detach the aerator from the faucet and put the various parts in place. Clean the parts by washing them with water. You can use a toothbrush to clean the screen. If there is more dirt, then soak it in vinegar, and, after some time, wash it with water. Then, reattach the aerator to the proper location.
Remove Deposits
Many people live in places with tough water. The high mineral content of hard water causes limescale build-up in faucets, which is usually a bit harder to remove. You can use window cleaner or a mild abrasive scrub to remove these stubborn stains, but vinegar can be a better choice.
Do Some Minor Maintenance
As important as cleaning the aerator is, you should take care of a few small things. Replace springs and seals occasionally if necessary. If you want, you can buy some simple faucet repair tools from hardware stores. You can use these simple kits to repair your kitchen faucet.
Fixing a pull-down kitchen faucet is relatively easy. You need to identify the source of leakage and follow these fixing methods.